VXLAN ipsec or wireguard
Transporting VLANs with VXLAN: Plain, WireGuard, and IPsec Compared
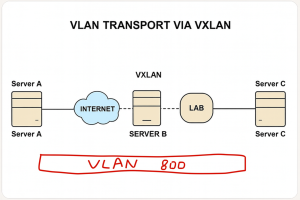
It’s been a while since my last post, but I believe this comprehensive guide will be valuable for anyone looking to transport VLANs from point A to point B using VXLAN. This article compares three setups—Plain VXLAN, VXLAN with WireGuard, and VXLAN with IPsec—covering configurations, performance results, and recommendations for secure and efficient VLAN transport. Whether you’re in a lab or a production environment, this guide has you covered.
Table of Contents
- Overview and Performance Results
- Setup 1: Plain VXLAN (No Encryption)
- Setup 2: VXLAN + WireGuard
- Setup 3: VXLAN + IPsec (StrongSwan)
- Conclusion and Recommendations
Overview and Performance Results
I tested three VXLAN configurations to transport a VLAN between two points, evaluating throughput, retransmissions, and security. Below is a summary of the setups and their performance.
Tested Configurations
- Plain VXLAN: Fastest but unsecure, ideal for private networks.
- VXLAN + WireGuard: Lightweight encryption with moderate performance overhead.
- VXLAN + IPsec: Robust encryption with near-plain performance due to hardware acceleration.
Performance Summary
| Setup | Total Throughput | Retransmissions | Notes |
|---|---|---|---|
| Plain VXLAN (no encryption) | 20.6–21.0 Mbit/s | 570 | Highest throughput; no encryption overhead. Normal retransmissions for UDP + VXLAN. |
| VXLAN + WireGuard | 18.0–18.3 Mbit/s | 527 | ~10–15% throughput drop; CPU handles WireGuard encryption. |
| VXLAN + IPsec | 20.1–20.5 Mbit/s | 464 | Near-plain VXLAN performance; VTI + kernel crypto + AES-NI minimize overhead. |
Key Observations
- Encryption Overhead
- WireGuard: CPU-intensive due to AES + UDP encapsulation.
- IPsec VTI: Lower overhead with kernel crypto and AES-NI hardware acceleration.
- UDP vs. ESP
- WireGuard: UDP-based, leading to some packet loss and more retransmissions.
- IPsec ESP (L3 tunnel): Minimal packet loss, near-plain VXLAN throughput.
- Plain VXLAN
- Fastest but unsecure, with low latency and maximum throughput.
- Vulnerable to sniffing or traffic injection on public networks.
Setup 1: Plain VXLAN (No Encryption)
Plain VXLAN offers the highest throughput but lacks encryption, making it suitable for private networks or lab environments.
Server A Configuration
# Bring up the network interface
ip link set ens192 up

# Create a bridge
sudo ip link add name br800 type bridge
sudo ip link set br800 up

# Create VXLAN tunnel
sudo ip link add vxlan800 type vxlan id 800 \
    local ip_public_serverA remote ip_public_serverB \
    dstport 4789 nolearning
sudo ip link set vxlan800 up

# Add interfaces to the bridge
sudo ip link set ens192 master br800
sudo ip link set vxlan800 master br800
Server B Configuration
Server B is behind NAT, so we use a dummy interface and connect to Server A’s public IP.
# Load dummy module
sudo modprobe dummy

# Create dummy interface
sudo ip link add name dummy800 type dummy
sudo ip link set dummy800 up

# Create a bridge
sudo ip link add name br800 type bridge
sudo ip link set br800 up

# Create VXLAN tunnel to Server A's public IP
sudo ip link add vxlan800 type vxlan id 800 \
    local ip_private_serverB remote ip_public_serverA \
    dstport 4789 nolearning
sudo ip link set vxlan800 up

# Add interfaces to the bridge
sudo ip link set dummy800 master br800
sudo ip link set vxlan800 master br800
sudo ip addr add 10.10.10.98/24 dev br800
Testing Plain VXLAN
# Test connectivity
ping -I br800 10.10.10.1

# Start iperf3 server
iperf3 -s -B 10.10.10.1  # On remote server ( you can consider it Server C )

# Run iperf3 client
iperf3 -c 10.10.10.1 -B 10.10.10.98 -P 4 -t 30
Sample iperf3 Output:
[ ID] Interval           Transfer     Bitrate         Retr
[  5]   0.00-30.00  sec  19.5 MBytes  5.45 Mbits/sec  186             sender
[  5]   0.00-30.04  sec  19.0 MBytes  5.30 Mbits/sec                  receiver
[  7]   0.00-30.00  sec  17.9 MBytes  5.01 Mbits/sec  118             sender
[  7]   0.00-30.04  sec  17.7 MBytes  4.94 Mbits/sec                  receiver
[  9]   0.00-30.00  sec  18.6 MBytes  5.20 Mbits/sec  119             sender
[  9]   0.00-30.04  sec  18.4 MBytes  5.13 Mbits/sec                  receiver
[ 11]   0.00-30.00  sec  19.1 MBytes  5.34 Mbits/sec  147             sender
[ 11]   0.00-30.04  sec  18.8 MBytes  5.26 Mbits/sec                  receiver
[SUM]   0.00-30.00  sec  75.1 MBytes  21.0 Mbits/sec  570             sender
[SUM]   0.00-30.04  sec  73.8 MBytes  20.6 Mbits/sec                  receiver
Performance: Plain VXLAN achieved 20.6–21.0 Mbit/s with 570 retransmissions, offering maximum throughput but no security.
Setup 2: VXLAN + WireGuard
This setup adds lightweight encryption with WireGuard, suitable for secure VLAN transport with a moderate performance hit (~10–15% lower throughput).
Step 1: Install WireGuard
sudo apt update
sudo apt install wireguard iproute2 -y
Step 2: Generate WireGuard Keys
wg genkey | tee privatekey | wg pubkey > publickey
Step 3: Configure WireGuard
Server A (/etc/wireguard/wg0.conf):
[Interface]
Address = 100.64.0.1/30
PrivateKey = <ServerA_privatekey>
ListenPort = 51820

[Peer]
PublicKey = <ServerB_publickey>
AllowedIPs = 100.64.0.2/32
Endpoint = server_B_external_ip:51820
PersistentKeepalive = 25
Server B (/etc/wireguard/wg0.conf):
[Interface]
Address = 100.64.0.2/30
PrivateKey = <ServerB_privatekey>
ListenPort = 51820

[Peer]
PublicKey = <ServerA_publickey>
AllowedIPs = 100.64.0.1/32
Endpoint = Server_A_external_ip:51820
PersistentKeepalive = 25
Step 4: Enable WireGuard
sudo wg-quick up wg0
sudo systemctl enable wg-quick@wg0

# Verify connectivity
ping -c 2 100.64.0.2  # From Server A
ping -c 2 100.64.0.1  # From Server B
Step 5: Configure VXLAN
Server A:
sudo ip link add vxlan800 type vxlan id 800 local 100.64.0.1 remote 100.64.0.2 dstport 4789 nolearning
sudo ip link set vxlan800 up

sudo ip link add name br800 type bridge
sudo ip link set br800 up
sudo ip link set vxlan800 master br800
sudo ip link set ens192 master br800
Server B:
sudo ip link add vxlan800 type vxlan id 800 local 100.64.0.2 remote 100.64.0.1 dstport 4789 nolearning
sudo ip link set vxlan800 up

sudo ip link add name br800 type bridge
sudo ip link set br800 up
sudo ip link set vxlan800 master br800
sudo ip link add name dummy800 type dummy
sudo ip link set dummy800 up
sudo ip link set dummy800 master br800
sudo ip addr add 10.10.10.98/24 dev br800
Step 6: Testing VXLAN + WireGuard
# Test connectivity
ping -I br800 10.10.10.1

# Start iperf3 server
iperf3 -s -B 10.10.10.1  # On remote server ( you can consider it Server C )

# Run iperf3 client
iperf3 -c 10.10.10.1 -B 10.10.10.98 -P 4 -t 30
Sample iperf3 Output:
[ ID] Interval           Transfer     Bitrate         Retr
[  5]   0.00-30.00  sec  15.9 MBytes  4.45 Mbits/sec  137             sender
[  5]   0.00-30.04  sec  15.6 MBytes  4.36 Mbits/sec                  receiver
[  7]   0.00-30.00  sec  16.2 MBytes  4.53 Mbits/sec  127             sender
[  7]   0.00-30.04  sec  15.9 MBytes  4.44 Mbits/sec                  receiver
[  9]   0.00-30.00  sec  15.5 MBytes  4.33 Mbits/sec  113             sender
[  9]   0.00-30.04  sec  15.3 MBytes  4.26 Mbits/sec                  receiver
[ 11]   0.00-30.00  sec  17.8 MBytes  4.99 Mbits/sec  150             sender
[ 11]   0.00-30.04  sec  17.5 MBytes  4.90 Mbits/sec                  receiver
[SUM]   0.00-30.00  sec  65.4 MBytes  18.3 Mbits/sec  527             sender
[SUM]   0.00-30.04  sec  64.3 MBytes  18.0 Mbits/sec                  receiver
Performance: VXLAN + WireGuard achieved 18.0–18.3 Mbit/s with 527 retransmissions, showing a ~10–15% performance drop due to CPU-based encryption.
Setup 3: VXLAN + IPsec (StrongSwan)
VXLAN over IPsec provides robust encryption with minimal performance overhead, leveraging VTI and AES-NI hardware acceleration.
Step 1: Install StrongSwan
apt install strongswan
Server A Configuration
Step 2: Configure IPsec
# /etc/ipsec.conf - strongSwan IPsec configuration file
config setup
    uniqueids = no

conn %default
    keyexchange=ikev2
    ike=aes128-sha256-modp2048
    esp=aes256-sha256
    dpdaction=clear
    dpddelay=300s
    fragmentation=yes

conn vxlan-ipsec
    left=ip_public_serverA
    leftid=ip_public_serverA
    leftsubnet=0.0.0.0/0
    leftupdown=/etc/strongswan.d/updown-vxlan.sh
    right=ip_public_serverB
    rightid=ip_private_serverB
    rightsubnet=0.0.0.0/0
    type=tunnel
    auto=start
    keyingtries=%forever
    authby=psk
    mark=10
Step 3: Configure IPsec Secrets
# /etc/ipsec.secrets
ip_private_serverB ip_public_serverA : PSK "putsomething"
Step 4: Create Up/Down Script
# /etc/strongswan.d/updown-vxlan.sh
#!/bin/bash
# Simple up/down script for VTI + VXLAN
case "$PLUTO_VERB" in
    up-client|up-host|up)
        logger "[$PLUTO_CONNECTION] VPN UP: creating interfaces"
        /usr/local/bin/create_vxlan.sh
        ;;
    down-client|down-host|down)
        logger "[$PLUTO_CONNECTION] VPN DOWN: deleting interfaces"
        /usr/local/bin/destroy_vxlan.sh
        ;;
esac
Step 5: Create VXLAN Setup Script
# /usr/local/bin/create_vxlan.sh
sudo ip link add ipsec0 type vti local ip_public_serverA remote ip_public_serverB key 10
sudo ip addr add 100.64.0.1/30 dev ipsec0
sudo ip link set ipsec0 up

sudo ip link add vxlan800 type vxlan id 800 local 100.64.0.1 remote 100.64.0.2 dstport 4789 nolearning
sudo ip link set vxlan800 up

sudo ip link add name br800 type bridge
sudo ip link set br800 up
sudo ip link set vxlan800 master br800
sudo ip link set ens192 master br800

sudo ip route del default table 220
Step 6: Create VXLAN Teardown Script
# /usr/local/bin/destroy_vxlan.sh
# Delete IPsec VTI
ip link del ipsec0

# Remove interfaces from bridge
sudo ip link set vxlan800 nomaster 2>/dev/null
sudo ip link set ens192.800 nomaster 2>/dev/null
sudo ip link set ens192 nomaster 2>/dev/null

# Delete bridge and VXLAN
sudo ip link del vxlan800 2>/dev/null
sudo ip link del br800 2>/dev/null

# Delete VLAN subinterface if created
sudo ip link del ens192.800 2>/dev/null
Server B Configuration
Step 1: Configure IPsec
# /etc/ipsec.conf - strongSwan IPsec configuration file
config setup
    uniqueids = no

conn %default
    keyexchange=ikev2
    ike=aes128-sha256-modp2048
    esp=aes256-sha256
    dpdaction=clear
    dpddelay=300s
    fragmentation=yes

conn vxlan-ipsec
    left=ip_private_serverB
    leftid=ip_private_serverB
    leftsubnet=0.0.0.0/0
    leftupdown=/etc/strongswan.d/updown-vxlan.sh
    right=ip_public_serverA
    rightid=ip_public_serverA
    rightsubnet=0.0.0.0/0
    type=tunnel
    auto=start
    keyingtries=%forever
    authby=psk
    mark=10
Step 2: Configure IPsec Secrets
# /etc/ipsec.secrets
ip_private_serverB ip_public_serverA : PSK "putsomething"
Step 9: Create Up/Down Script
# /etc/strongswan.d/updown-vxlan.sh
#!/bin/bash
# Simple up/down script for VTI + VXLAN
case "$PLUTO_VERB" in
    up-client|up-host|up)
        logger "[$PLUTO_CONNECTION] VPN UP: creating interfaces"
        /usr/local/bin/create_vxlan.sh
        ;;
    down-client|down-host|down)
        logger "[$PLUTO_CONNECTION] VPN DOWN: deleting interfaces"
        /usr/local/bin/destroy_vxlan.sh
        ;;
esac
Step 3: Create VXLAN Setup Script
# /usr/local/bin/create_vxlan.sh
sudo ip link add ipsec0 type vti local ip_private_serverB remote ip_public_serverA key 10
sudo ip addr add 100.64.0.2/30 dev ipsec0
sudo ip link set ipsec0 up

sudo ip link add vxlan800 type vxlan id 800 local 100.64.0.2 remote 100.64.0.1 dstport 4789 nolearning
sudo ip link set vxlan800 up

sudo ip link add name br800 type bridge
sudo ip link set br800 up
sudo ip link add name dummy800 type dummy
sudo ip link set dummy800 up
sudo ip link set vxlan800 master br800
sudo ip link set dummy800 master br800

sudo ip addr add 10.10.10.98/24 dev br800

sudo ip route del default table 220
Step 4: Create VXLAN Teardown Script
# /usr/local/bin/destroy_vxlan.sh
# Delete IPsec VTI
ip link del ipsec0

# Remove interfaces from bridge
sudo ip link set vxlan800 nomaster 2>/dev/null
sudo ip link set dummy800 nomaster 2>/dev/null

# Delete VXLAN, dummy, and bridge
sudo ip link del vxlan800 2>/dev/null
sudo ip link del dummy800 2>/dev/null
sudo ip link del br800 2>/dev/null
Testing VXLAN + IPsec
# Test connectivity
ping -I br800 10.10.10.1

# Start iperf3 server
iperf3 -s -B 10.10.10.1

# Run iperf3 client
iperf3 -c 10.10.10.1 -B 10.10.10.98 -P 4 -t 30
Sample iperf3 Output:
[ ID] Interval           Transfer     Bitrate         Retr
[  5]   0.00-30.00  sec  20.7 MBytes  5.80 Mbits/sec  117             sender
[  5]   0.00-30.04  sec  20.4 MBytes  5.71 Mbits/sec                  receiver
[  7]   0.00-30.00  sec  17.0 MBytes  4.74 Mbits/sec  116             sender
[  7]   0.00-30.04  sec  16.7 MBytes  4.66 Mbits/sec                  receiver
[  9]   0.00-30.00  sec  18.8 MBytes  5.25 Mbits/sec  115             sender
[  9]   0.00-30.04  sec  18.5 MBytes  5.15 Mbits/sec                  receiver
[ 11]   0.00-30.00  sec  16.7 MBytes  4.67 Mbits/sec  116             sender
[ 11]   0.00-30.04  sec  16.5 MBytes  4.59 Mbits/sec                  receiver
[SUM]   0.00-30.00  sec  73.2 MBytes  20.5 Mbits/sec  464             sender
[SUM]   0.00-30.04  sec  72.0 MBytes  20.1 Mbits/sec                  receiver
Performance: VXLAN + IPsec achieved 20.1–20.5 Mbit/s with 464 retransmissions, nearly matching plain VXLAN due to VTI and AES-NI acceleration.
Conclusion and Recommendations
- Public Internet: Use VXLAN + IPsec for robust security and near-plain performance, or VXLAN + WireGuard for lightweight encryption.
- Private Networks/Labs: Plain VXLAN offers maximum throughput but no security.
- Performance: IPsec’s kernel-mode crypto and AES-NI support make it slightly faster than WireGuard in this setup.
For detailed networking guides, explore our Networking Tutorials.